Enjoyment of the whispering winds, the zephyrs,
the airstreams of the Sierra Nevada and Great Basin areas of the
United States in a recreational vehicle.
Trailer Wheel Bearings
The standard recommendation is that you re-pack
your trailer wheel bearings once a year. This is because trailers
tend to sit a lot and that can contribute to condensation inside the
wheel and that can lead to rust which, in turn, leads to particles
which can score surfaces and cause friction and bearing failure.
Re-packing the bearings also makes it easy to inspect your brakes and
running gear in order to detect and fix potential problems before
they become a hazard.
Doin' the wheel bearing 'thang' is not that
complicated or sophisticated a task and can easily be done by
amateurs willing to wrestle with awkward and heavy tires and hubs.
Plan on an hour or two for each wheel (under half hour if you are
serious and have everything figured out).
Be sure to take appropriate safety measures.
Set up a spot with plenty of working room that is well lit and free
of dust and grit. Keep wheels chocked to limit any trailer motion. If
using jacks to lift the trailer be sure to use jack stands as a
backup. Eye protection will be needed. Plan ahead and plan for
safety.
Background
Trailer wheel bearings are the roller bearing type
with a series of rollers in a cage. These roll inside a race or cup
that is a strip of metal press fit into the hub. There is an inner
bearing for the part of the hub towards the middle of the trailer
axle and an outer bearing which is the one you see when you remove
the nut under the dust cap. A grease seal is press fit into the hub
over the inner bearing. The seal keeps bearing grease from leaking
out of the hub onto the brake surfaces. Grease leaking past the outer
bearing is controlled by a washer, nut, and dust cap.
The hub and bearing assembly slides onto a spindle
attached to the axle with the grease seal on the inside and a washer
and nut on the outside holding it in place.
Re-packing wheel bearings means removing the hub,
pounding out the old grease seal, cleaning the bearings and hubs of
all old grease, cleaning the spindle, packing the cleaned bearings
with new grease, 'painting' all inside hub surfaces and the spindle
with new grease to help prevent rust, and reassembling the hub on the
spindle with the right tension.
Tools
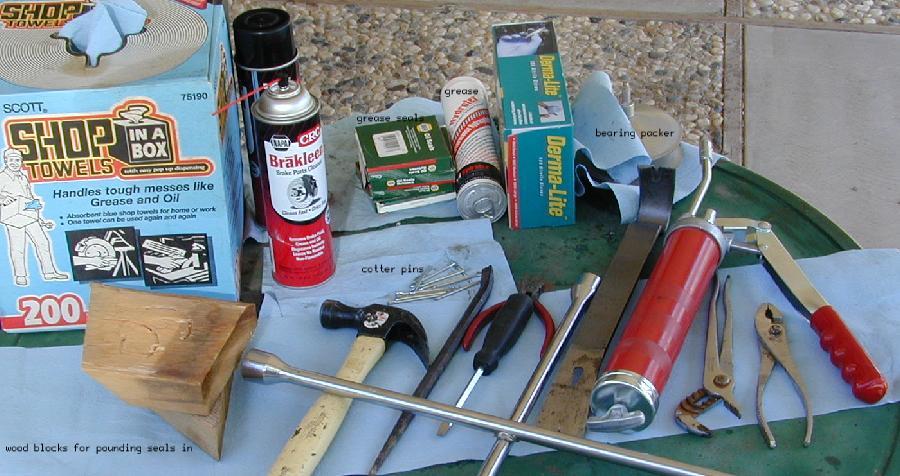 There
is no real need for any special tools. The hub nut is so large a 12
inch crescent wrench may not open wide enough so water pump pliers
may be used. This nut should never be much more than finger tight so
the pliers work just fine. Standard pliers are used to handle the
cotter pin. The cotter pin keeps the nut from rotating after it is
set. A rod or bar or maybe even a screwdriver is needed to reach
through the hub so you can pound the old grease seal out of the hub.
The pry bar is a convenient means to get something between the grease
seal and bearing that you can pound on to push the old grease seal
out. A small block of wood is needed to evenly pound the new grease
seal into the hub. Diagonal cutters can be used to help trim the
cotter pin after installation.
There
is no real need for any special tools. The hub nut is so large a 12
inch crescent wrench may not open wide enough so water pump pliers
may be used. This nut should never be much more than finger tight so
the pliers work just fine. Standard pliers are used to handle the
cotter pin. The cotter pin keeps the nut from rotating after it is
set. A rod or bar or maybe even a screwdriver is needed to reach
through the hub so you can pound the old grease seal out of the hub.
The pry bar is a convenient means to get something between the grease
seal and bearing that you can pound on to push the old grease seal
out. A small block of wood is needed to evenly pound the new grease
seal into the hub. Diagonal cutters can be used to help trim the
cotter pin after installation.
The picture shows a gadget designed for packing
wheel bearings with grease (upper right corner, wrapped in blue
towel). You will probably find that it wastes too much grease for a
one trailer job and it really isn't that much of a hassle to pack
bearings by hand. If you don't like to get grease on your hands, use
the latex gloves (box shown came from an auto parts store) or pack
bearings inside a clear plastic bag.
One 'tool' not shown in the picture is a trash
can. You need a good sized receptacle for grease laden rags and old
parts. You may also need to consider procedures for disposal of
cleaning fluids.
click on the image for a larger view with descriptions of
the various tools
Supplies
The supplies you will need are paper towels or
rags, cleaning fluid, and brake cleaner. Latex gloves might be nice
to help keep your hands clean, too. The 1975 Airstream service manual
suggests using kerosene as a cleaning fluid but what you use now may
suffer environmental and safety concerns. Brake cleaner is an aerosol
spray that you will need to clean off any grease that gets on brake
surfaces. It is also makes for a good final cleaning step for the
bearings. Rags or paper towels are needed to mop up all the old
grease and do the initial cleaning.
You can use brake clean for a cleaning fluid. It
is convenient and works very well to clean up whatever grease is left
after wiping parts down with a rag but it may take about two or three
cans per wheel and it costs about $2 or $3 per can.
Parts
Hopefully the only parts you will need are grease
seals and cotter pins. The auto store wanted $25 for each grease seal
(you need one for each wheel); a bearing specialty store wanted $12;
and e-trailer says they cost $4.50. So where you buy parts can make a
big difference in how much you pay. When you go to get new parts, be
sure to take a sample of the old one with you because it usually has
a part number or can be measured to make sure you get the proper
replacement.
Grease should also be on your parts list. You can
pick up a tub of basic trailer hub grease or you can get it in a tube
for a grease gun. The grease gun is a convenience for holding and
supplying grease as needed.
Bearings and races, if they need replacing, should
be replaced as a set. These aren't that expensive but, again, that
might depend upon your source. You can often find a complete package
of inner and outer bearings and races with a seal and cotter pin for
$20 to $30.
Set up
Set up three work stations. One at the axle end
with pliers and screwdriver and a place to set the lug nuts, another
for cleaning and packing the bearings, and a third for cleaning the
hub that is sturdy enough to support a bit of pounding to get the
grease seal in and out. Put a stool near the axle end so you can sit
while working the lug nuts and moving the wheel and hub around. Get a
chair to sit in while you clean and pack the bearings.
Hopefully the only pounding you will need to do
will be to remove and install the grease seal. The proper tool would
be a brass drift but screwdrivers can usually handle the light loads
needed for the job of removing the seal. A block and hammer is all
that is needed to install a new seal. However, if you need to replace
a bearing, you will need a decent drift to help you get the race for
the bearing out of the hub and also to install the new race without
doing damage to the race or hub.
Caveats and Cautions
Don't drop parts! You don't want to ding
the bearings and you don't want to get any dust or grit into them as
it might score surfaces.
Inspect carefully. After you clean
everything thoroughly, carefully inspect the bearings and the
races for rough spots, pits, or anything other than a nice shiny
smooth surface. Any discoloration or roughness is an indication of
trouble.
Clean grease from anywhere it shouldn't be.
Make sure there is no hint of grease on any brake surfaces.
Tension carefully and check. When you
tighten the nut down on the washer and outer bearing, don't be too
aggressive. First make it pretty tight (some spec 20 ft lbs) while
turning the hub in order to seat the bearings. Then loosen the nut
before taking it down snug until you get resistance with your wrench
(or pliers) then back off a notch to where you can install the cotter
pin. This should provide a few thousands of an inch worth of
movement. You can check after you get the tire on and lug nuts snug
(but still off the ground). Grab the top of the tire and tug back and
forth. You should hear and feel a slight thunk-thunk as you pull the
tire back and forth but there should be very little noticeable play
in the wheel.
Take the opportunity to check other other
parts while you have the hub off. Clean the cobwebs or debris from
the brake parts and check for wear. Check wires for good connections.
Make sure springs are attached.
Tighten lug nuts properly, set them to the
proper torque when you have the wheel on the ground, and check them
again after a few miles.
Do a followup check after a few miles on
the road to make sure the lug nuts stay tight and the hub cool.
Keep spares or at least specs - Some folks
suggest keeping a spare set of parts in your toolkit. This may not be
necessary but you should have part numbers for the grease seals,
inner and outer bearings, and inner and outer races (or cones) in
your trailer documentation set. Trailer places can probably pull the
right parts off the wall just knowing the size, weight rating, and
number of lugs on your hub but parts stores will want to look up
numbers in their cross reference book.
Resources
How to:
Parts and Supplies:
Nno endorsement or rating or recommendation should
be implied or suggested - use at your own risk!
Other
comments? Let us know! - send to
rvtech@SierraNevadaAirstreams.org
Sierra
Nevada Airstreams home page
-|- Destinations
-|- Memories
-|- Owner's Guide
-|- WBCCI Sierra Nevada Unit
home page
-|- Community
-|- Zephyrs
weblog for the RV enthusiast
-|- Commerce
-|- Whispers
weblog of touchy subjects
-|- Our tip jar- support this website
Support
our site, Donations accepted thanks to the Amazon.com

TechComm
Labs (tm)
|
|
|
|
note:
all photographs on this site are for personal, private, and
non-commercial use only. All other copyrights are retained by the
individual photographers. See our
policy. Disclaimer:
any advice or suggestion presented is provided for informational
purposes only and is correct and accurate only to the best of our
knowledge at the time it was written. Anyone using such information
does so at their own risk. Errors or omissions may exist and
additional sources of information or appropriately licensed or
qualified personnel should be consulted in deciding a course of
action. We assume no liability or obligation by providing this
information and warn any users of this information that they do so at
their own risk. All links or references to commercial vendors or
other sources of information and equipment do not intend or imply or
convey any endorsement of that source or the product. They are
provided strictly for informational purposes to illustrate the topic
at hand. Sierra Nevada
Airstreams Enjoyment
of the whispering winds, the zephyrs, the airstreams of the Sierra
Nevada and Great Basin areas of the United States is a
personal, nonprofit,
noncommercial web site intended for educational and recreational use
only. This site is supported by volunteer effort and contributions.